Assessed via PURCHASING UAM, ORDER, ADD.
Adding a Purchase Order
Every purchase order comprises four elements:
| 1. | The order header - containing the PO Number, additional reference, delivery details, contact details etc |
| 2. | The order lines - containing the items required including quantities and costs with any associated supplier part number and notes. |
| 3. | The line schedule - controlling the date and quantity of each line delivery as well as special notes. |
| 4. | The schedule allocation - controlling where item is to be allocated or shipped from. |
Adding or Revising a Purchase Order Header
Once ADD has been selected many of the transaction options will have been pre-defined. This is to speed up the order entry process while still retaining the ability to customise the order.
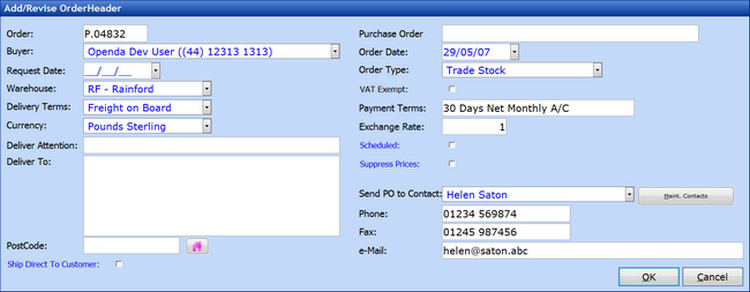
With the exception of the contact fields which were derived from the Choose Contact combination field, all other data on this order header was pre-filled from details set during the supplier set-up. See Supplier Maintenance. Entries with black text cannot be amended at this point; blue text is under your control.
ORDER: The system generated purchase order transaction number.
BUYER: The default buyer set against the supplier. Use of the combination field will allow change.
REQUEST DATE: Generally used if the order has been pre-requested by phone. This date should reflect the actual date ordered.
WAREHOUSE: The default warehouse set for this supplier, defining which warehouse the will be received in to.
DELIVERY TERMS: The pre-defined delivery terms set for the supplier.
CURRENCY: The pre-defined currency set for the supplier. If the supplier is set to allow multi currency, the field text will be blue.
DELIVER ATTENTION: Text field for name entry where delivery is specified for an individual.
DELIVER TO: The delivery address will be the warehouse address unless overridden at this point.
POSTCODE: Delivery address postcode. If entered first the ![]() icon will invoke the Address Finder option (where applicable).
icon will invoke the Address Finder option (where applicable).
SHIP DIRECT TO CUSTOMER: If selected the purchase order will be delieverd directly to the address in the field above, by passing the goods receipt and warehouse despatch process. See Direct Shipped PO's for further details
PURCHASE ORDER REF: Free text for entry of a further reference if required.
ORDER DATE: Defaults to today's date but is available for change.
ORDER TYPE: Defaulted at supplier set-up, this details the type of item being purchased, i.e. trade stock or office supplies.
VAT EXEMPT: Details if VAT is valid or exempt for this order.
PAYMENT TERMS: The terms agreed between the supplier and your organisation.
EXCHANGE RATE: If ordering in "home" currency, this value will be 1. If alternate currency the latest exchange rate held by the system will be shown.
SCHEDULED: This check box is defaulted by a Parameter Setting but can be amended here at order level. In this instance the default is set to Off. This will mean that as order lines are added a single schedule will be added automatically, therefore if you wish to change or amend the schedule you will need to enter via the SCHEDULE function button. If the check box was ticked, On, then the schedule would not be added automatically and you would be taken to add schedules after the entry of each order line.
SUPPRESS PRICES: Selecting this option will prevent the prices being shown on the purchase order paperwork.
SEND PO TO CONTACT: Select from existing contacts by way of the combination option or add a new contact by selecting MAINT CONTACTS.
PHONE: Filled from contact details if completed.
FAX: Filled from contact details if completed.
EMAIL: Filled from contact details if completed.
Once you have completed your header input select OK to add the order lines or cancel to decline the header.
Adding a Purchase Order Line
To revise an order line see Purchase Order.
On accepting the order header you will be given the Item Enquiry screen. This is to allow you to choose the correct item and see all the related information for that item. For full details see Item UAM.
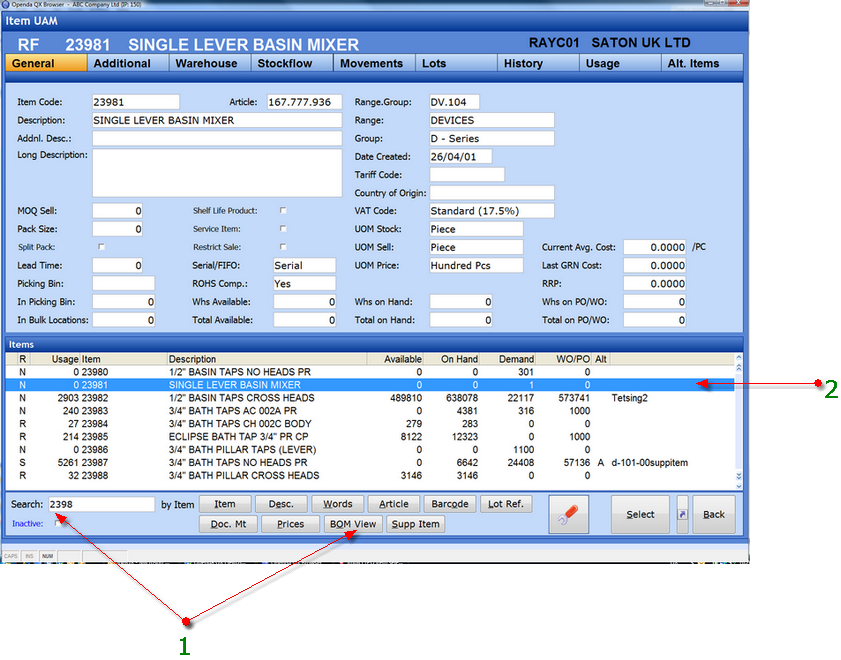
1 - By way of the item enquiry mechanisms enter the item you wish to place on purchase order and the screen will be as follows.
2 - Highlight or click on the item required and SELECT.
Once selected the option to select a supplier item number or add a new supplier item will be given. See Supplier Items.
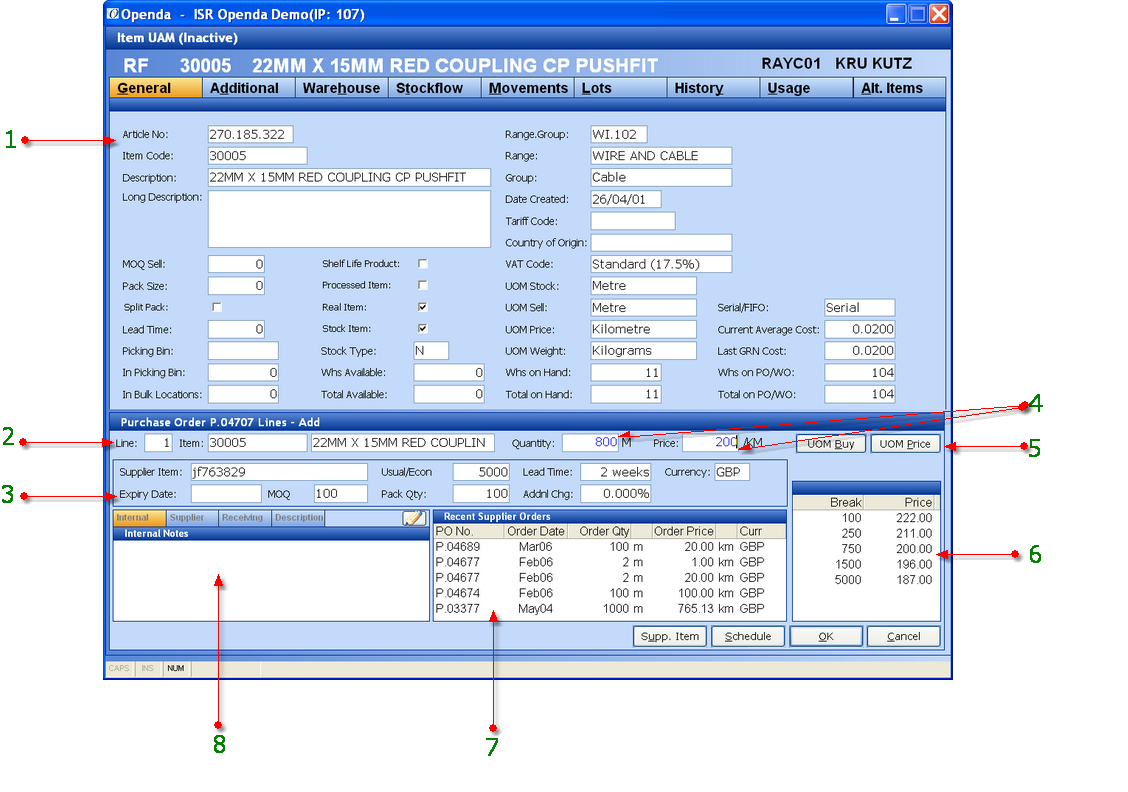
1 - The top of the screen contains full details from the item UAM of the item added to the order. Once a quantity is added all TABs may be accessed.
2 - Line number with item and description for the line addition.
3 - Supplier item frame. Visible only if a supplier item exists.
4 - Total Quantity required and the price to be paid. If a supplier price list exists as in 6, the price will default based on the quantity entered.
5 - Although each item has a default unit of measure, it can be amended as supplier item or at order entry.
6 - The price list specific to this supplier built within the Supplier Item option from the Purchasing UAM.
7- Details of the 5 most recent purchase orders placed for this item.
8 - 4 TAB options for adding notes for this order line.
Function button options are
SUPP. ITEM - Add or select a supplier item for the item added.
SCHEDULE - Access the schedule options for the purchase order line.
Once line entry is complete select OK to accept or CANCEL to decline.
Adding and revising purchase order line schedules
Purchase order schedules are there to reflect the delivery requirements of your items. Therefore for each order line there may be a single schedule or multiple schedules spread over weeks months or years. Each schedule has a request date, which is the date the goods are required and a promised date, which is the date the supplier has agreed to deliver the goods. If the request date is left blank it will appear as ASAP. The promised date may be left blank and filled in once the supplier has notified their delivery intentions.
By selecting SCHEDULE from the order line addition the display will be as follows.
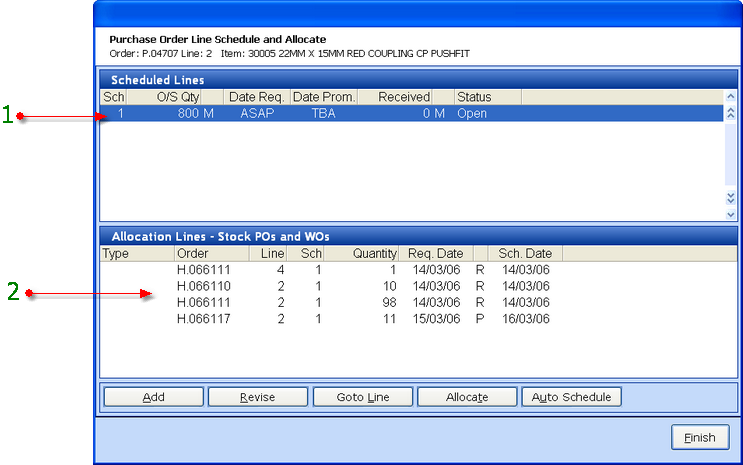
1 - As the Schedule check box was not ticked on the header of this order the highlighted schedule was set-up automatically.
2 - The allocation lines frame shows all unallocated demand for this item.
ADD - Enter a new schedule. If the quantity ordered is to be broken into, for example, 2 schedules of 400, schedule 1 should be reduced in quantity and then schedule 2 added. If a second schedule is added without reducing the first the order line quantity will increase to equal the sum of the two schedule quantities.
REVISE - Amend the highlighted schedule.
GOTO LINE - search for a specific schedule number.
ALLOCATE - Activates the Allocation frame, then by highlighting the required line, quantity from this PO schedule will link to the demand ensuring the stock availability once the goods are received.
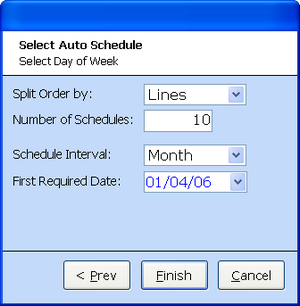
AUTO SCHEDULE - This allows the set-up of multiple schedules based on a wizard process. The schedules may be broken by quantity or lines and spread out over weeks or months:
Once selected any demand allocations can then be set.
On completion of the purchase order lines the option is given to release the purchase order

If NO the order will be be held against the user as New PO status until it is released.
If YES a further question is asked
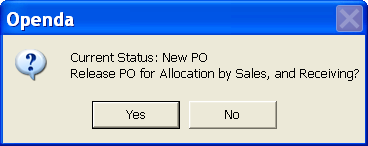
If YES the status will be updated to ToReceive and the order will be available for sending to the supplier and the goods to be received during the Goods In process.
If NO the order will be released but the status left at "New PO". At this point the the order can be sent to the supplier but the order would not be available for the goods in receiving process.