Accessed from Access and System Utilities via the Utilities Menu
The User Maintenance is the access point for adding and revising system users. Each user must have a unique three digit initial set and will be issues with an initial password and four digit PIN number.
The User Maintenance works alongside the user specific Parameter Settings and function User Group Access Control, to build and enforce the security of Openda QX.
Viewing User Maintenance
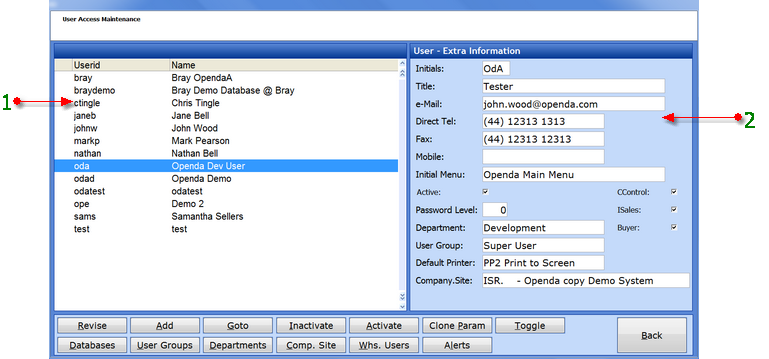
1 - On entry this lists all active system users. TOGGLE will show all users. Inactive users will be displayed with an "I" while Pending users will have a "?" display.
2 - The access details relating to the highlighted user.
REVISE - Amend the highlighted user.
ADD - Create a new user.
GOTO - Search for users beginning.
INACTIVATE - Make an active user inactive.
ACTIVATE - Activate an inactive user. This will change the user to pending until a password has been issued and verified.
CLONE PARAM - This options allows the parameter settings of one user to be copied onto another. Simply highlighted the user for the parameters change, select CLONE PARAM and choose the user whose parameters will be copied. Also see Parameter Settings.
TOGGLE - Switch between Active and All users.
DATABASES - The databases that the highlighted user connects to. These are set as a default but are available for amendment.
USER GROUPS - Add and Revise the system user groups along with their menu, maintenance and reporting access rights. See below.
DEPARTMENTS - Add and Revise company departments.
COMPANY SITE - Add and Revise the Company and Site details. This can be used within Parameter Settings, allowing parameters to be set by company or by site. Each user is then assigned to a Company / Site.
WHS USERS - This option allows the addition of extra users purely for warehouse functions. This option does not create system access, only a userid and pin number for use where multiply people log in to one terminal. A UserID, 4 digit PIN number, Name and Initials are required for set-up.
ALERTS - Set the menu screen Alert notification parameters for the highlighted user. See below.
User Groups
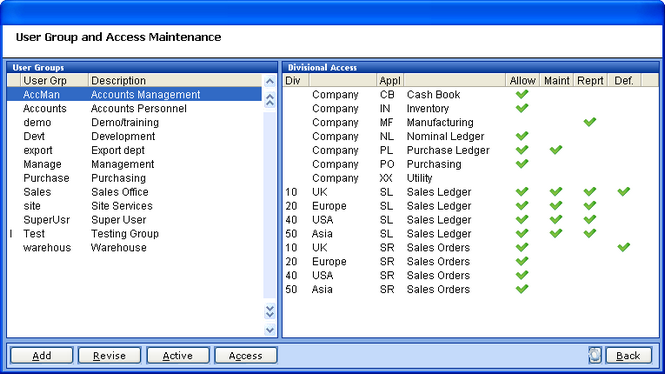
The left frame lists the various User Groups while the right frame shows the access control for the highlighted User Group. The ADD REVISE and ACTIVE functions relate to the User Group while ACCESS allows the revision of the User Group Access options for Menus (Allow), Maintenance Menus (Maint), and Reports (Rept). While Default (Def) controls which division options, where relevant, are set.
See User Group Access Control for function access.
User Alerts
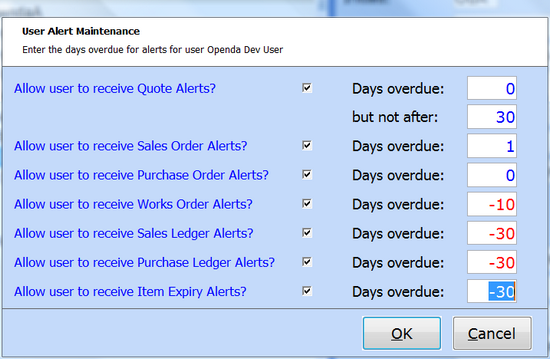
By selecting the individual options below the linked user can be alerted to various issues. The figures in the right hand column designate at which point in time the alerts will appear. Negative RED numbers are the number of days prior to the event, where as the Blue positive numbers are the days following the event. Each user will only get customers / suppliers etc that are relevant to them. To view all users alerts a toggle icon is available once the grid has been activated.
E.g.
The first option for expired Quotes, i.e. the number of days prior to expiry up until a set number of days past expiry.
The second for Sales Orders Line Schedules not shipped "N" days before / after the Request Date
The third for Purchase Order Line Schedules not received "N" days before / after the Request Date
These alerts are then viewable each time you view the main menu screen. By clicking into the grids further icon options are available to toggle between individual user alerts and all alerts as well as removing the alert from your list.
Adding a New User
Once ADD is selected the must first enter a unique USERID once entered the following input frame is given:
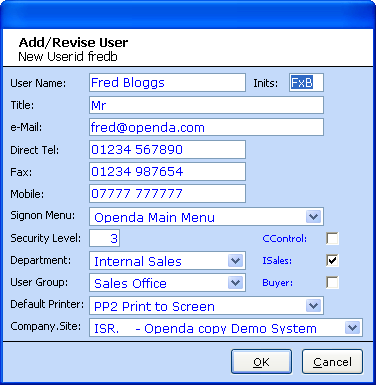
The title of the frame states the user id of the user being created (Add / Revise User New Userid fredb).
USER NAME - The new users name.
INITS - The users unique 3 digit initials (in this instance "Fred" does not have a middle name so it has been replaced with "X"). These initials will be seen throughout the system linked to any transactional stage processed by this user.
TITLE - Mr, Mrs, Miss, Dr etc.
E-MAIL - The Users company e-mail address. Dependant on the type of user this may be pulled onto documentation.
DIRECT TEL - Dependant on the type of user this may be pulled onto documentation.
FAX - Dependant on the type of user this may be pulled onto documentation.
MOBILE - The Users company mobile number. Dependant on the type of user this may be pulled onto documentation.
INITIAL MENU - The menu for first view when entering the system.
PASSWORD LEVEL - This setting determines the type and frequency of change for password.
0 - No password change is forced.
1 - Must change password, but password may be re-used on a subsequent change.
2 - Must change password, but password cannot be re-used.
3 - Must change password, length must be greater or equal 5 characters and cannot be re-used.
4 - Must change password, length > = 5 and must contain a number, letter and a special character. I.e. %*~ etc.
DEPARTMENT - The department in which the user is employed.
USER GROUP - The User Group in which the used is set. This affects function access. Any user deemed a system administrator should be set as a "Master User". As this option has greater access powers than a standard user.
DEFAULT PRINTER - The main printer to be used. This can be overriden at program level.
COMPANY.SITE - The company and site in which the user is employed. This is only valid with multi-site organisations.
CCONTROL - If enabled the user is a "Credit Control" user and can be seen and selected for Credit Control functions.
ISALES - If enabled this user is an "Internal Sales" user and can be seen and selected for Internal Sales functions.
BUYER - If enabled this user is a "Buyer" user and can be seen and selected for Buying functions.
Once all details have been entered and accepted a temporary password will be issued.
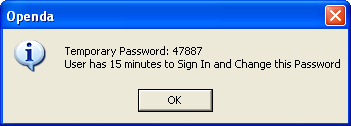
The user is not set-up in Pending status, to make the user Active continue as follows:
| • | A new session should be started, entering the new USERID and the temporary password. |
| • | A prompt will then be given to enter and verify a new password. |
| • | A further field will prompt for a 4 digit PIN number. This may be personally chosen, entered and verified or by returning through the two PIN fields will system allocate the PIN. All PIN numbers must be unique, therefore if the PIN is personally chosen a check will be made to ensure the number is unique and advised if unavailable. |
Once the new password and PIN have been entered and verified the user will be made active and system access will be allowed.