Accessed via Financial/Nominal Maintenance from the Utilities Menu
The Nominal Report Generator allow you to build your financial statements as you require them.
Viewing and printing existing reports or adding a new report can all be done via the Nominal Report Generator.
On access the screen is as follows:
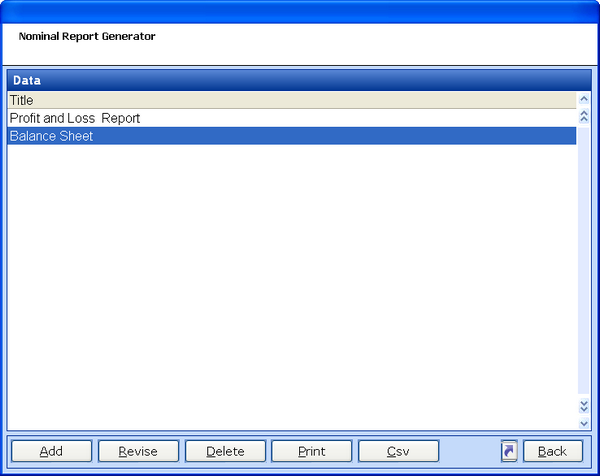
Existing reports are listed.
ADD - Build a new report
REVISE - Amend the highlighted report.
DELETE - Remove the highlighted report
PRINT - Produce the highlighted report - first the financial period for reporting must be selected.
CSV - Output the highlighted report to a spreadsheet format - first the financial period for reporting must be selected.
Understanding and Revising a Nominal Report
By selecting REVISE you can see how an existing report is built
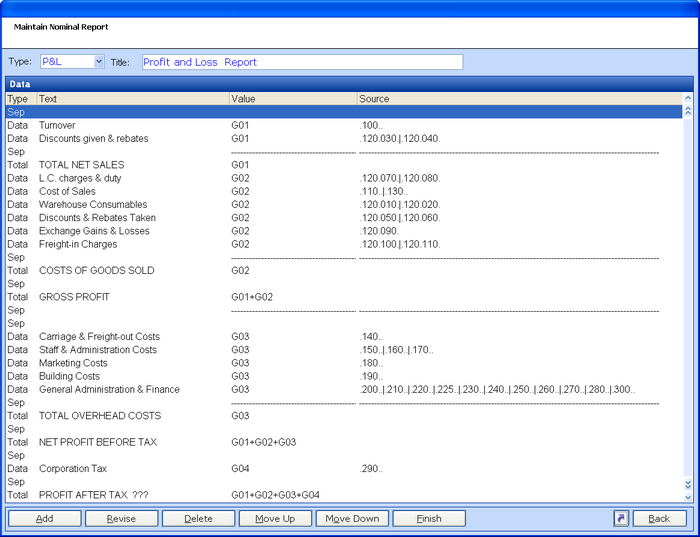
Explaining the columns
TYPE - The Type column holds 3 options
Sep - Separator - This is simply a break in the print it can be a blank line, a single line or a double line and is used to clarify the data for ease of reading.
Data - This is a data display line showing the title and figures for which you wish to build the report.
Total - This is a calculation line to show the totals of data lines previously added.
TEXT - This column defines the title to be displayed for the Data or Total line type.
VALUE - The Value column defines the group in which the Data line is held and where a Total is to be calculated from multiple groups, each of the groups are shown.
SOURCE - This shown the | separated list of the Nominal Main.Sub accounts that the Data lines are to be pulled from.
Function Options
ADD - Enter a new line be it a Sep, Data or Total to the report. The line will be added at the point after the highlight line on the grid.
REVISE - Amend the highlighted line.
DELETE - Remove the highlighted line.
MOVE UP - Move the highlighted line up the page and therefore the print.
MOVE DOWN - Move the highlighted line down the page and therefore the print .
FINISH - Complete the report addition or revision.
Adding a New Nominal Report
From the initial Nominal Report Generator screen select the ADD option.
This initial request will be for the Title of the new report.
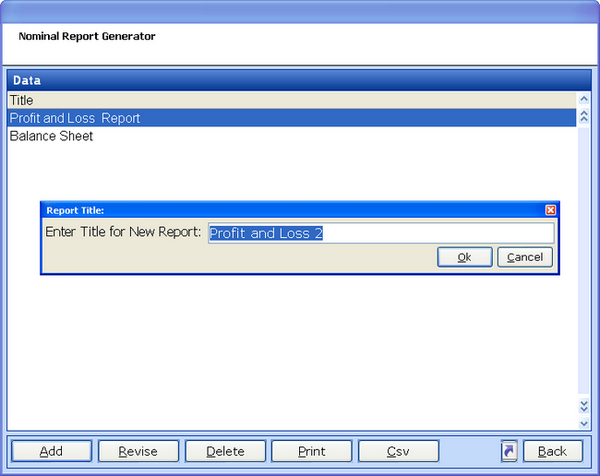
CANCEL will undo the addition
OK will take you to the next stage.
Upon OK the report header will be created. At this point you can choose to change the Title and choose if the report is to only container P & L (Profit and Loss) nominal account types or contain ALL (P&L & BS).
You can then proceed to add the first line to the report.
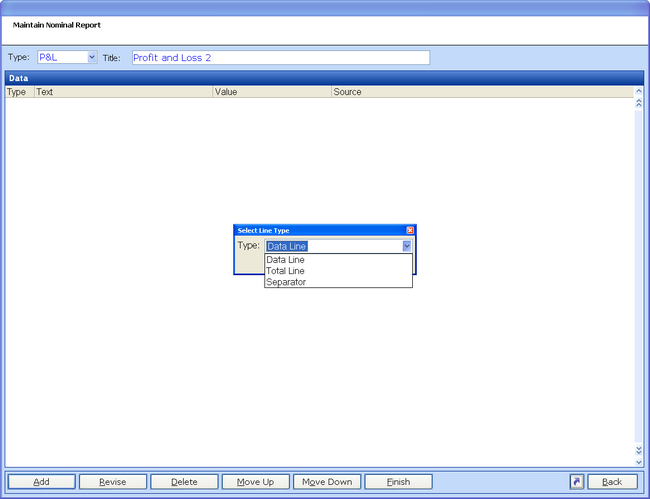
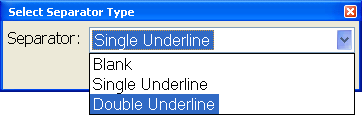
ADD will ask you to select the line type you require. For neatness you may choose the initial line to be a Separator in which case a further selection is given to choose the type of separator you require: Blank, Single Underline or Double Underline.
From this point you can compose the "body" of your report, building up the data and totaling to form the report output. Use of separator line can be used to indicated breaks in data or sub and grand totals.
Understanding the purpose of Groups:
Groups are simply defined as G01, G02, G03 etc. The reason to associate a Group with a Data line is so that you can choose which lines of data can be accumulated to create a Total. By doing this you can have Data lines from various places throughout the report adding together to create a Total. You can also choose to add Multiple Groups together to create grand Totals. Please see the picture under Understanding and Revising a Nominal Report at the top of this page for examples
Adding a Data line
When selected, you will then be asked to add the title of the Data line. From here you will be given a screen where that title can be amended and the Group in which this data is to be held can be chosen.
Once the group has been chosen you must then select the Nominal Account Code that you wish to relate to this Data line. This can be done in 2 ways as an individual account line via ADD or for a range of accounts select RANGE.
The ADD option:
This allows the selection of an individual Nominal account
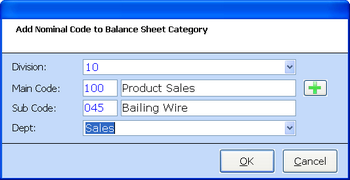
The Division can be selected or left blank if no divisional breakdown is required.
The Main Code and Sub Code can be entered or selected by use of the ![]() icon. The selection can be made at Main code only if required.
icon. The selection can be made at Main code only if required.
The Dept can be selected or left blank if no departmental breakdown is required.
The RANGE option:
This allows a account from and to to be chosen which will create a data line for each account within the range under the same group code.
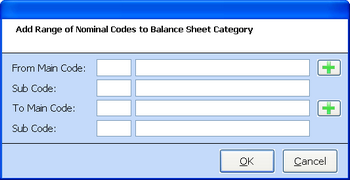
Again the codes can be added or selected by use of the ![]() icon.
icon.
Adding a Total Line
As with adding a Data line the initial input will be for a title for the Total line. Once added you must choose which Group or Groups are to be included in this Total calculation.
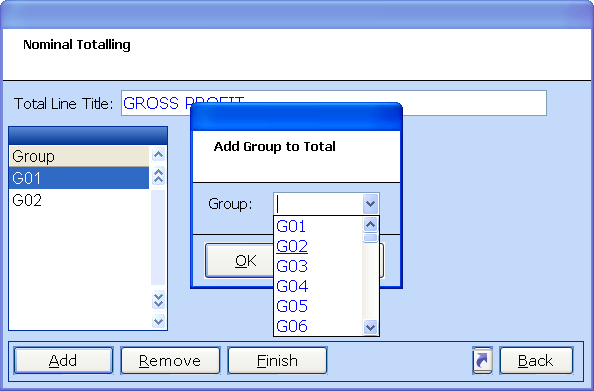
The ADD option allows you to select Group codes to be added to the calculation list while REMOVE will delete the group from the Total calculation.
Once all the Groups have been added select FINISH.
Once all the Separator, Data and Total line have been added FINISH will complete the report addition. It is then available to output by PRINT or CSV for the financial period selected.
TIP: As when adding any new line, it will add below the highlighted line, it may be easier to reverse the list by pressing your HOME key. This will mean you can add from the top of the list and not need to scroll down for each new addition.